2009年1月5日 星期一

IBM ServerRaid 6M 處理心得...

0 意見

受夠了每次 IBM Server Raid 一直出問題.
把從開始到現在遇到的問題處理解決辦法寫出來.

1. 遇到所有硬碟都 Defunct (DDD) 該怎麼辦:

  手段一 : 可以試著將硬碟一台一台連線, 直到最後一個, 或倒數第二個 , Logical Drive 會變成 Compacting... 這時就救回來了. 剩下的硬碟可以用 rebuild 加回去 (但要等到  compacting 完畢才行)

  手段二 : 可能真的有一個硬碟壞了, 請參考
   http://origin2.pixnet.net/blog/post/1126641
   就是要找到真正壞的那一個硬碟, 然後再一個一個 set online.

2. 找不到 configuration (連硬碟的定義都沒有, 變成 new drives) 該怎麼辦.

  手段二 : 有三種方法可以做 copy the configuration from drives.
     1. 開機時使用 Ctrl - I 進入 mini-configuration
     2. 用 server raid boot CD (進 linux, 使用 server raid manager), 操作, 對 Controller 按右鍵選 copy the configuration from drives.
     3. 正常開機, 使用 OS 當中的 Server Raid Manager 作一樣的事.

3. 連顯示燈都不亮 (Identify Drive)  該怎麼辦? (Controller is not responding...)
  1. 檢查你是否插錯線, 或插錯 Channel.
  2. 試著作 copy the configuration from drive.
  3. 都沒輒了, 死馬當活馬醫, 把所有硬碟都拔下來, 在 server raid manager 啟動的情況下, 用空的 disk raid 去插線, 直到 controller is responding...訊息出現...
       此時表示你插對線了! , 再一個一個把硬碟插上, set online.

... Read more.

HEMiDEMi Technorati Del.icio.us MyShare個人書籤 Yahoo
2008年12月16日 星期二

.NET 取得固定 Hash code 的方法

0 意見

常常看到使用 object.GetHashCode() 來取得一個物件的 HashCode.
重點是, 把 HashCode 當成是 database index , 或是用來跟其他程式溝通, 這都是不對的.

請看 MSDN 裡面關於 object.GetHashCode() 的 Remarks :
我摘錄重要的幾句話 (VS 2008 中, 關於 object.GetHashCode() 的說明):
The default implementation of the GetHashCode method does not guarantee unique return values for different objects. Furthermore, the .NET Framework does not guarantee the default implementation of the GetHashCode method, and the value it returns will be the same between different versions of the .NET Framework. Consequently, the default implementation of this method must not be used as a unique object identifier for hashing purposes.
以上說明了, .NET Framework 變更會導致 GetHashCode() 回傳不一樣的值.

The GetHashCode method for an object must consistently return the same hash code as long as there is no modification to the object state that determines the return value of the object's Equals method. Note that this is true only for the current execution of an application, and that a different hash code can be returned if the application is run again.

以上更清楚說明, 就算是相同的 .NET Framework, 如果是不一樣的執行程序, 或是你的程式再跑一次, 可能相同的物件會回傳不同的 HashCode.


所以, 使用 GetHashCode() 只限定該次程式執行環境拿來當索引, 一旦你多個程式要溝通, 或是寫進 db, 寫進檔案等, 當作下次索引, 這都是不對的!


那! 要如何取得不變的  HashCode ?
以下列出方法之一 , 就是取用 MD5CryptoServiceProvider 來產生固定的 HashCode.

using System;
using System.Collections.Generic;
using System.Text;
using System.Security.Cryptography;

namespace HashCodeTool
{
/// <summary>
/// 利用 MD5 Hash , 產生 string->long hash key.
/// </summary>
public sealed class MD5HashUtils
{
/// <summary>
/// 停用 Constructor, 因為這個 Class 是用來提供 static function 的.
/// </summary>
private MD5HashUtils() { }

private static MD5CryptoServiceProvider md5 = new MD5CryptoServiceProvider();
/// <summary>
/// 利用 MD5 Hash , 產生 string->long hash key.
/// It should be thread safe.
/// if string is null or empty, return 0.
/// </summary>
/// <param Name="str"></param>
/// <returns></returns>
public static long ComputeHashKey(string str)
{
if (String.IsNullOrEmpty(str))
return 0;

// for threadsafe, lock md5
byte[] buf;
lock (md5)
buf = md5.ComputeHash(Encoding.Unicode.GetBytes(str));
int longbytes = 8;
int longmaskindex = 0;
long r = 0;
for (int i = 0; i < buf.Length; i++)
{
r = r ^ ((long)buf[i] << (longmaskindex * 8));
longmaskindex++;
if (longmaskindex >= longbytes)
longmaskindex = 0;
}
return r;
}

/// <summary>
/// 利用 MD5 Hash , 產生 string->int hash key.
/// It should be thread safe.
/// if string is null or empty, return 0.
/// </summary>
/// <param name="str"></param>
/// <returns></returns>
public static int ComputeIntHashKey(string str)
{
if (String.IsNullOrEmpty(str))
return 0;

// for threadsafe, lock md5
byte[] buf;
lock (md5)
buf = md5.ComputeHash(Encoding.Unicode.GetBytes(str));
int intbytes = 4;
int longmaskindex = 0;
int r = 0;
for (int i = 0; i < buf.Length; i++)
{
r = r ^ ((int)buf[i] << (longmaskindex * 8));
longmaskindex++;
if (longmaskindex >= intbytes)
longmaskindex = 0;
}
return r;
}
}
}
... Read more.

HEMiDEMi Technorati Del.icio.us MyShare個人書籤 Yahoo

String.Compare 能不能夠忽略全形/半形呢

0 意見

話說 .NET String.Compare 很簡單就可以忽略大小寫...
但沒想到它有權重, 這導致一些問題,
比方說, 全形/半形的權重比英文字母小,
所以全形半形混雜的排序就會如同下面這樣:

abc
COACH
coach
coach2
COBCH
cox
ha
za

阿...那我要找 C 開頭的字, 都被全形拆開來啦,
這樣 String.Compare 能不能夠忽略全形/半形呢?

最後, 終於找到 CultureInfo.Compare 可以下 CompareOptions.IgnoreWidth ...
範例碼如下:

   1: class Program
   2:     {
   3:  
   4:         static void Main(string[] args)
   5:         {
   6:             List<string> lst = new List<string>() {
   7:                 "coach", "coach2", "COACH","COBCH","cox","ha","abc","za"
   8:             };
   9:  
  10:             lst.Sort((x, y) => CompareStr(x, y));
  11:  
  12:             foreach (string s in lst)
  13:                 Console.WriteLine(s);
  14:  
  15:             Console.WriteLine("-----------");
  16:  
  17:             string f = "c";
  18:             int index = lst.BinarySearch(f, new compare());
  19:             if (index < 0)
  20:             {
  21:                 index = ~index;
  22:                 for (int i = index; i < lst.Count; i++)
  23:                 {
  24:                     if (CompareStr(lst[i],f, f.Length) == 0)
  25:                         Console.WriteLine(lst[i]);
  26:                     else
  27:                         break;
  28:                 }
  29:             }
  30:             Console.ReadLine();
  31:         }
  32:  
  33:         public static int CompareStr(string x, string y)
  34:         {
  35:             return CultureInfo.InvariantCulture.CompareInfo.Compare(x, y, CompareOptions.IgnoreWidth | CompareOptions.IgnoreCase);
  36:         }
  37:  
  38:         public static int CompareStr(string x, string y, int len)
  39:         {
  40:             return CultureInfo.InvariantCulture.CompareInfo.Compare(x, 0, len, y, 0, len, CompareOptions.IgnoreWidth | CompareOptions.IgnoreCase);
  41:         }
  42:     }
  43:  
  44:     class compare : IComparer<string>
  45:     {
  46:  
  47:         #region IComparer<string> 成員
  48:  
  49:         public int Compare(string x, string y)
  50:         {
  51:             return Program.CompareStr(x, y);
  52:         }
  53:  
  54:         #endregion
  55:     }
... Read more.

HEMiDEMi Technorati Del.icio.us MyShare個人書籤 Yahoo
2008年1月13日 星期日

.NET Framework delegate performance?

0 意見

自從 C# 3.0 (VS2008) 引入 anonymous method, 我很愛用這個, 但是記得曾經看過 delegate performance 不如 virtual function 好,
所以寫個小程式試驗.
在知道結果之後, 有找到官方說法:

The Truth about Delegates

其中有提到 : "Delegates are efficient. Invoking a delegate is as fast as invoking a virtual method."

那就看看程式執行結果吧:

Code:

   1: using System;
   2: using System.Collections.Generic;
   3: using System.Text;
   4:  
   5: namespace DelegatePerformance
   6: {
   7:     class Program
   8:     {        
   9:         static void Main(string[] args)
  10:         {
  11:             for (int i = 0; i < 5; i++)
  12:             {
  13:                 int testtimes = 100000000;
  14:                 test1 t1 = new test1(delegate() { return 0; });
  15:                 test2 t2 = new test2();
  16:                 test1 t3 = new test1(new test1.SimpleDelegate(f1));
  17:                 test1 t4 = new test1(new test1.SimpleDelegate(new Program().f2));
  18:                 DateTime begin1 = DateTime.Now;
  19:                 t1.dofunction(testtimes);
  20:                 DateTime end1 = DateTime.Now;
  21:                 DateTime begin2 = DateTime.Now;
  22:                 t2.dofunction(testtimes);
  23:                 DateTime end2 = DateTime.Now;
  24:                 DateTime begin3 = DateTime.Now;
  25:                 t3.dofunction(testtimes);
  26:                 DateTime end3 = DateTime.Now;
  27:                 DateTime begin4 = DateTime.Now;
  28:                 t4.dofunction(testtimes);
  29:                 DateTime end4 = DateTime.Now;
  30:                 Console.WriteLine("delegate:" + (end1 - begin1).ToString() + " , without delegate:" + (end2 - begin2).ToString() + " , delegate2:" + (end3 - begin3).ToString() + " , delegate3:" + (end4 - begin4).ToString());
  31:             }
  32:         }
  33:         static int f1()
  34:         {
  35:             return 0;
  36:         }
  37:         int f2()
  38:         {
  39:             return 0;
  40:         }
  41:     }
  42:  
  43:     class test1
  44:     {
  45:         public delegate int SimpleDelegate();
  46:  
  47:         private SimpleDelegate msd;
  48:         public test1(SimpleDelegate sd)
  49:         {
  50:             msd = sd;
  51:         }
  52:  
  53:         public void dofunction(int times)
  54:         {
  55:             for (int i = 0; i < times; i++)
  56:                 msd();
  57:         }
  58:     }
  59:  
  60:     class test2
  61:     {
  62:         private int ssd()
  63:         {
  64:             return 0;
  65:         }
  66:  
  67:         public test2()
  68:         {
  69:         }
  70:  
  71:         public void dofunction(int times)
  72:         {
  73:             for (int i = 0; i < times; i++)
  74:                 ssd();
  75:         }
  76:     }
  77: }

執行結果:
delegate:00:00:00.9740000 , without delegate:00:00:00.7070000 , delegate2:00:00:01.0150000 , delegate3:00:00:00.8260000
delegate:00:00:00.9470000 , without delegate:00:00:00.6970000 , delegate2:00:00:01.0150000 , delegate3:00:00:00.8230000
delegate:00:00:00.9500000 , without delegate:00:00:00.6930000 , delegate2:00:00:01.0110000 , delegate3:00:00:00.8260000
delegate:00:00:00.9500000 , without delegate:00:00:00.7030000 , delegate2:00:00:01.0110000 , delegate3:00:00:00.8240000
delegate:00:00:00.9530000 , without delegate:00:00:00.6950000 , delegate2:00:00:01.0190000 , delegate3:00:00:00.8350000


看樣子差不了多少...雖然有慢一點點, 不過以一億次 times 的scale 應該還好.

... Read more.

HEMiDEMi Technorati Del.icio.us MyShare個人書籤 Yahoo
2008年1月7日 星期一

WIX Localization

0 意見

首先, 介紹 WIX Localization Project : http://www.tramontana.co.hu/wix/loc/index.php

從這裡你也許可以找到你要的語系檔案.

然後, 在 Wix 的專案的 Property 當中, 選 Linker , Cultures, 填入你想要的語系 (如 : zh-tw)

image

最後, 在專案當中加入你的語系檔案 (以 zh-tw 為例, 就是 WixUI_zh-tw.wxl)

這樣最後的檔案就是繁體中文的安裝程式囉!

... Read more.

HEMiDEMi Technorati Del.icio.us MyShare個人書籤 Yahoo

WIX and Votive UI Dialog

0 意見

初步介紹 WIX 之後, 可是該安裝只有最基本的 --- 安裝中...
太陽春了, 要如何產生基本的安裝對話窗呢?

首先, 參考 : http://wix.sourceforge.net/manual-wix2/WixUI_dialog_library.htm

image因為我們用 VS2008 + Voltive, 先把 UI Extension DLL 參考進來吧.

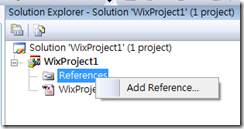
透過 References 按右鍵, 我們可以加入 WIX 的參考 DLL.

之後, 可以在  WIX 安裝目錄的 bin當中 (一般是  C:\Program Files\Windows Installer XML V3\bin) 找到一些可以參考的 DLL.


image

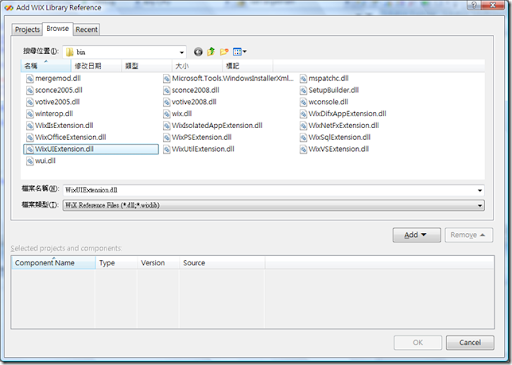
因為要使用 UI, 所以當然是選 WixUIExtension.dll 囉!

Okay, 然後, 在 wxs 檔案中的 Product 內加入 <UIRef Id="WixUI_Minimal" />,如下:

<Product ....>
...
<UIRef Id="WixUI_Minimal" />
...
</Product>

這樣就有最基本的對話窗囉!

除了 WixUI_Minimal (最基本), 當然還有

WixUI_Mondo : 幾乎所有的對話窗都有了.

WixUI_FeatureTree : 從 WixUI_Mondo 變化而來, 只缺少了 SetupTypeDialog (安裝類型 Dialog)

WixUI_InstallDir: 不讓使用者選擇  SetupType and Features, 但是讓使用者選擇安裝目錄.


那...如果上面的還不夠, 就只能自訂 Dialog 囉, 自訂 Dialog 從無到有是很麻煩的一件事, 所以最簡單的方法是, 從上面四個基本的 Dialog UI 模組 copy 下來,

然後自己更改, 這樣最快了!

比方說, <UIRef Id="WixUI_Mondo" /> , 可以去找 WixUI_Mondo.wxs 的原始碼, 改掉 UI 的 ID , 就變成下面的 code:


1:  <UI Id="MyWixUI">
2:   <
TextStyle Id="WixUI_Font_Normal" FaceName="Tahoma" Size="8" />
3:   <
TextStyle Id="WixUI_Font_Bigger" FaceName="Tahoma" Size="12" />
4:   <
TextStyle Id="WixUI_Font_Title" FaceName="Tahoma" Size="9" Bold="yes" />

5:   <
Property Id="DefaultUIFont" Value="WixUI_Font_Normal" />
6:   <
Property Id="WixUI_Mode" Value="Mondo" />

7:   <
DialogRef Id="ErrorDlg" />
8:   <
DialogRef Id="FatalError" />
9:   <
DialogRef Id="FilesInUse" />
10:   <
DialogRef Id="MsiRMFilesInUse" />
11:   <
DialogRef Id="PrepareDlg" />
12:   <
DialogRef Id="ProgressDlg" />
13:   <
DialogRef Id="ResumeDlg" />
14:   <
DialogRef Id="UserExit" />

15:   <
Publish Dialog="ExitDialog" Control="Finish" Event="EndDialog" Value="Return" Order="999">1</Publish>

16:   <
Publish Dialog="WelcomeDlg" Control="Next" Event="NewDialog" Value="LicenseAgreementDlg">1</Publish>

17:   <
Publish Dialog="LicenseAgreementDlg" Control="Back" Event="NewDialog" Value="WelcomeDlg">1</Publish>
18:   <
Publish Dialog="LicenseAgreementDlg" Control="Next" Event="NewDialog" Value="SetupTypeDlg" Order="2">LicenseAccepted = "1"</Publish>

19:   <
Publish Dialog="SetupTypeDlg" Control="Back" Event="NewDialog" Value="LicenseAgreementDlg">1</Publish>
20:   <
Publish Dialog="SetupTypeDlg" Control="TypicalButton" Event="NewDialog" Value="VerifyReadyDlg">1</Publish>
21:   <
Publish Dialog="SetupTypeDlg" Control="CustomButton" Event="NewDialog" Value="CustomizeDlg">1</Publish>
22:   <
Publish Dialog="SetupTypeDlg" Control="CompleteButton" Event="NewDialog" Value="VerifyReadyDlg">1</Publish>

23:   <
Publish Dialog="CustomizeDlg" Control="Back" Event="NewDialog" Value="MaintenanceTypeDlg" Order="1">WixUI_InstallMode = "Change"</Publish>
24:   <
Publish Dialog="CustomizeDlg" Control="Back" Event="NewDialog" Value="SetupTypeDlg" Order="2">WixUI_InstallMode = "InstallCustom"</Publish>
25:   <
Publish Dialog="CustomizeDlg" Control="Next" Event="NewDialog" Value="VerifyReadyDlg">1</Publish>

26:   <
Publish Dialog="VerifyReadyDlg" Control="Back" Event="NewDialog" Value="CustomizeDlg" Order="1">WixUI_InstallMode = "InstallCustom"</Publish>
27:   <
Publish Dialog="VerifyReadyDlg" Control="Back" Event="NewDialog" Value="SetupTypeDlg" Order="2">WixUI_InstallMode = "InstallTypical" OR WixUI_InstallMode = "InstallComplete"</Publish>
28:   <
Publish Dialog="VerifyReadyDlg" Control="Back" Event="NewDialog" Value="CustomizeDlg" Order="3">WixUI_InstallMode = "Change"</Publish>
29:   <
Publish Dialog="VerifyReadyDlg" Control="Back" Event="NewDialog" Value="MaintenanceTypeDlg" Order="4">WixUI_InstallMode = "Repair" OR WixUI_InstallMode = "Remove"</Publish>

30:   <
Publish Dialog="MaintenanceWelcomeDlg" Control="Next" Event="NewDialog" Value="MaintenanceTypeDlg">1</Publish>

31:   <
Publish Dialog="MaintenanceTypeDlg" Control="ChangeButton" Event="NewDialog" Value="CustomizeDlg">1</Publish>
32:   <
Publish Dialog="MaintenanceTypeDlg" Control="RepairButton" Event="NewDialog" Value="VerifyReadyDlg">1</Publish>
33:   <
Publish Dialog="MaintenanceTypeDlg" Control="RemoveButton" Event="NewDialog" Value="VerifyReadyDlg">1</Publish>
34:   <
Publish Dialog="MaintenanceTypeDlg" Control="Back" Event="NewDialog" Value="MaintenanceWelcomeDlg">1</Publish>
35:   </
UI>

36:   <
UIRef Id="WixUI_Common" />


就從這個開始修改起, 會快速不少.

... Read more.

HEMiDEMi Technorati Del.icio.us MyShare個人書籤 Yahoo